This Azure AI Vision article will show how to generate an image caption with Azure AI Vision and .NET C# application.
Azure AI Vision is a Microsoft Azure service that is part of the Azure AI Services suite of cloud services, which also includes speech services and the popular Azure OpenAI service.
With Azure AI Vision, we can perform the following operations on images and vision objects:
- Optical Character Recognition (OCR) allows us to extract text from images, whether they are printed or handwritten, as we will see in this post.
- Extract visual features, generate captions, and identify faces and objects.
- Recognise human faces for facial recognition software, including image blurring and access control.
To perform AI operations on images, we use the official Microsoft Azure SDK for .NET. The AI Vision library is called Azure.AI.Vision.ImageAnalysis.
Deploy Azure AI Vision Resource
Before using Azure AI Vision with .NET, we must deploy a resource using the Azure portal, Azure PowerShell or Bicep, as we will do in the example below.
The Bicep template below will deploy an Azure AI Resource. To learn more about Azure Bicep, visit this blog.
resource aivision ‘Microsoft.CognitiveServices/accounts@2023-05-01’ = { name: ‘CognitiveServices’ location: ‘southeastasia’ sku: { name: ‘S0’ } kind: ‘ComputerVision’ properties: { } }
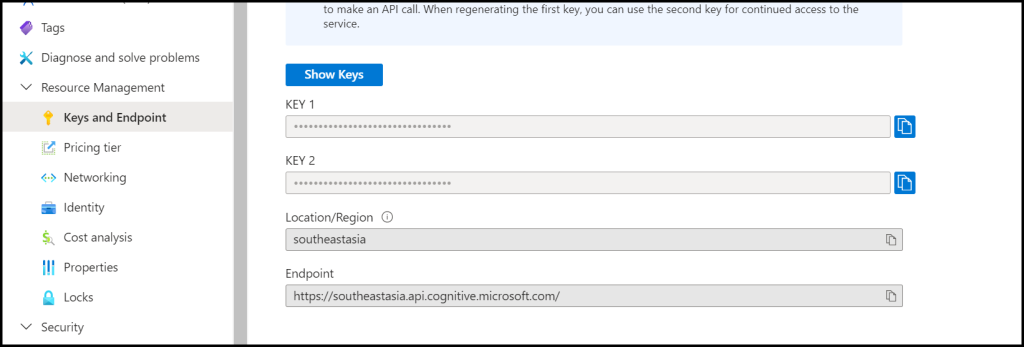
Once the service is deployed, Open the resource from the Azure portal and note the API Key and Endpoint. To retrieve the key and endpoint during deployment, visit our previous post on Retrieving Azure AI Services Keys and Endpoints Using Bicep.

Program
Now that we have the service deployed to Azure and the access details to the service, we can use the AI Vision library to Generate an Image Caption with Azure AI Vision and .NET.
Create a C# console application and install the Vision library using the following command.
dotnet add package Azure.AI.Vision.ImageAnalysis –version 1.0.0-beta.3
Note: The program uses ‘appsettings.json’ to read the Key and Endpoint details of the AI Vision resource. To use one visit this post.
To use the program, copy the code below and create a folder called “images” in the application’s root directory. This folder should contain all the necessary images for generating captions.
using System;
using System.IO;
using System.Net.Http;
using System.Net.Http.Headers;
using System.Text;
using System.Text.Json;
using System.Threading.Tasks;
using System.Drawing;
using Microsoft.Extensions.Configuration;
using Azure;
using Azure.AI.Vision.ImageAnalysis;  // AI Vision namespace

public class Program
{
    static void Main()
    {
        AnalyzeImages();
    }

    static void AnalyzeImages()
    {
        // Get config settings from AppSettings
        IConfigurationBuilder builder = new ConfigurationBuilder().AddJsonFile("appsettings.json");
        IConfigurationRoot configuration = builder.Build();
        string aiSvcEndpoint = configuration["AIServicesEndpoint"];
        string aiSvcKey = configuration["AIServicesKey"];

        ImageAnalysisClient client = new ImageAnalysisClient(
            new Uri(aiSvcEndpoint),
            new AzureKeyCredential(aiSvcKey));

        string[] imageFiles = Directory.GetFiles("images");

        foreach (string imageFile in imageFiles)
        {
            using FileStream stream = new FileStream(imageFile, FileMode.Open);

            ImageAnalysisResult result = client.Analyze(
                BinaryData.FromStream(stream),
                 VisualFeatures.Caption,
            new ImageAnalysisOptions { GenderNeutralCaption = true });


            Console.WriteLine($"Image caption results:");
            Console.WriteLine($" Caption for: ${imageFile} " );
            Console.WriteLine($"   '{result.Caption.Text}', Confidence {result.Caption.Confidence:F4}");


        }
    }
}
An example output is shown below.
Image caption results:
 Caption for: $images\image1.png
   'a screenshot of a computer', Confidence 0.8131
At CPI, we help many companies develop AI Solutions using Azure AI Services. for more information how we can help you contact us.
Related Articles
Discover more from CPI Consulting -Specialist Azure Consultancy
Subscribe to get the latest posts sent to your email.


Trackbacks/Pingbacks