
When working with OpenAI’s APIs, it’s often useful to manage stored files programmatically. In this guide, I’ll show you how to build a Model Context Protocol (MCP) agent using C# that calls OpenAI and lists all files in your OpenAI storage. This method effectively demonstrates creating an MCP server in C# to call OpenAI and list files.
Step 0: Installing Required Packages
Before running the project, you need to install a few important NuGet packages for creating an MCP server in C# to call OpenAI and list files.
Use the following dotnet commands to install them:
dotnet add package OpenAI --version 2.5.0
dotnet add package Microsoft.Extensions.Hosting --version 8.0.0
dotnet add package Microsoft.Extensions.DependencyInjection --version 8.0.0
dotnet add package Microsoft.Extensions.Logging --version 8.0.0
dotnet add package ModelContextProtocol.Server --version 0.4.4
Here’s why each package is needed:
- OpenAI: Connects to OpenAI’s API for file management and more.
- Microsoft.Extensions.Hosting: Provides background task hosting.
- Microsoft.Extensions.DependencyInjection: Handles dependency injection.
- Microsoft.Extensions.Logging: Adds console logging support.
- ModelContextProtocol.Server: Enables MCP server capabilities, essential for creating an MCP server in C# to call OpenAI and list files.
Make sure you run these commands inside your project directory.
To read about Azure MCP Server click here.
Step 1: Setting Up the MCP Agent
We start by creating a .NET console application.
The Program.cs file is the main entry point for the application and a critical part of creating an MCP server in C# to call OpenAI and list files.
In the code, we:
- Use
Microsoft.Extensions.Hostingto build a hosted console app. - Set up a server that communicates over standard input/output (STDIO).
Here’s the important startup code:
var builder = Host.CreateApplicationBuilder(args);
builder.Logging.AddConsole(consoleLogOptions => {
    consoleLogOptions.LogToStandardErrorThreshold = LogLevel.Trace;
});

builder.Services
    .AddMcpServer()
    .WithStdioServerTransport()
    .WithToolsFromAssembly();

await builder.Build().RunAsync();
This ensures that the app is MCP-compliant and ready to communicate with tools like GitHub Copilot.
Step 2: Connecting to OpenAI
To connect to OpenAI, we use the OpenAI and OpenAI.Files namespaces from the OpenAI .NET SDK.
We configure a static provider:
public static class OpenAIFileClientProvider
{
    public static readonly OpenAIFileClient FileClient = new OpenAIClient(Environment.GetEnvironmentVariable("OPENAI_API_KEY")).GetOpenAIFileClient();
}
The OPENAI_API_KEY must be set as an environment variable before running the application.
Step 3: Creating the MCP Tool to List Files
The OpenAITool class provides the method to call OpenAI and return a list of files:
[McpServerToolType]
public static class OpenAITool
{
    [McpServerTool, Description("Call OpenAI")]
    public static async Task ListOpenAIFiles()
    {
        var files = await OpenAIFileManager.ListFilesAsync(OpenAIFileClientProvider.FileClient);
        return JsonSerializer.Serialize(files);
    }
}
Important:
For MCP to work correctly, the tool must return a JSON object.
That’s why we serialize the list of files using JsonSerializer.Serialize(files).
Step 4: Handling File Listing
The helper class OpenAIFileManager is responsible for fetching the file list:
public class OpenAIFileManager
{
public static async Task> ListFilesAsync(OpenAIFileClient fileClient)
{
var fileList = new List();
try
{
OpenAIFileCollection files = await fileClient.GetFilesAsync();
foreach (OpenAIFile file in files)
{
fileList.Add(file);
Console.WriteLine($”ID: {file.Id}, Name: {file.Filename}, Size: {file.SizeInBytes} bytes”);
}
}
catch (Exception ex)
{
Console.WriteLine($”Error retrieving files: {ex.Message}”);
}
return fileList;
}
}
We fetch all files, log them to the console for troubleshooting, and return them as a list.
Step 5: MCP Server Configuration
The mcp.json file defines how the MCP server will run the OpenAI tool:
{
“servers”: {
“OpenAITool”: {
“type”: “stdio”,
“command”: “dotnet”,
“args”: [
“run”,
“–project”,
“C:\\Repos\\MCP-OpenAI-Files\\MCP-OpenAI-Files.csproj”
]
}
}
}
This tells MCP how to start and interact with our dotnet-based MCP server.
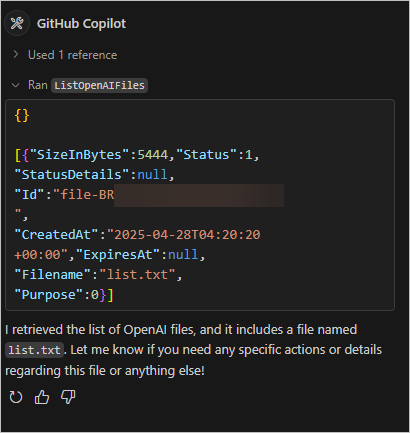
Step 6: The Final Result
After running the project, the MCP server successfully calls OpenAI, lists all the files, and returns a JSON output.
Here’s an example of the returned JSON:
[
  {
    "SizeInBytes": 5444,
    "Status": 1,
    "StatusDetails": null,
    "Id": "file-BR3wsx7wo456",
    "CreatedAt": "2025-04-28T04:20:20+00:00",
    "ExpiresAt": null,
    "Filename": "list.txt",
    "Purpose": 0
  }
]
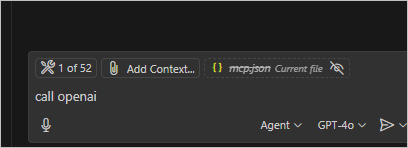
And visually, the results inside the GitHub Copilot MCP interface look like this:
Another screenshot showing the results:
Final Notes
✅ The MCP agent is fully tested and working.
✅ It correctly calls OpenAI, lists files, and returns a JSON object as required by MCP.
✅ The project is simple, clean, and can easily be extended to upload, delete, or manage OpenAI files programmatically, showcasing the flexibility of creating an MCP server in C# to call OpenAI and list files.
If you’re working with MCP agents and OpenAI, this setup will save you a lot of time and give you a solid starting point!
If you need help with OpenAI contect us below.
Discover more from CPI Consulting
Subscribe to get the latest posts sent to your email.